Integrating Webflow Forms with Klaviyo: A Simple Connection
Integrating Webflow and Klaviyo for Enhanced User Data Management
Webflow offers a seamless web design experience, but integrating it with Klaviyo for user data management requires a bit of custom coding. This guide is designed to help you, whether you're working with a standard Webflow form or a custom one.
Preliminary Setup in Klaviyo
1. Creating a Test List
- Login to Klaviyo and navigate to Audience → Lists & Segments.
- Create a new static test list for development purposes.
- To find the list ID, click on the list from the Lists & Segments panel. The ID is at the URL's end.
2. Obtaining Your Public API Key
- While logged into Klaviyo, click your profile at the bottom-left of the navigation panel.
- Go to Settings → Account → API Keys.
- Copy the Public API Key and keep it for later use.
Setting Up Your Webflow Form
Standard Webflow Form Configuration
- Design your Webflow form as usual.
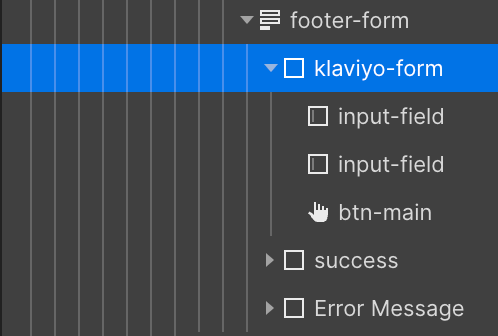
- In the Form Block Container, add a class named klaviyo-form.
- In the Element Settings panel:
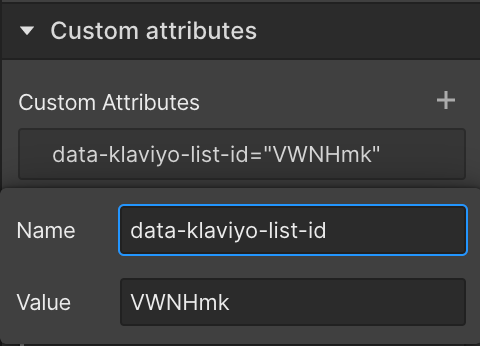
- Click on "+ Add New Attribute."
- Set the name field to data-klaviyo-list-id and the value to your specific Klaviyo list ID (e.g., TWQ4EC).
Example Webflow Form Code:
Naming Input Fields Correctly
This is a critical step. Klaviyo attributes act as data containers; the data might not sync correctly if your Webflow input fields don’t match these attribute names. Any attributes that don’t match will be treated as custom attributes.
Standard Klaviyo Attributes
For clarity, it’s crucial to know which attributes are considered standard by Klaviyo. Here they are:
https://developers.klaviyo.com/en/reference/create_client_profile
- email: Individual's email address.
- phone_number: Individual's phone number in E.164 format.
- external_id: A unique identifier used by customers to associate Klaviyo profiles with profiles in an external system.
- anonymous_id: For identifying a profile by Klaviyo's web tracking.
- _kx: Also known as the exchange_id.
- first_name: Individual's first name.
- last_name: Individual's last name.
- organization: Name of the company/organization.
- title: Individual's job title.
- image: URL pointing to a profile image.
The script will pick up these default attributes. See the code snippet below:
Steps:
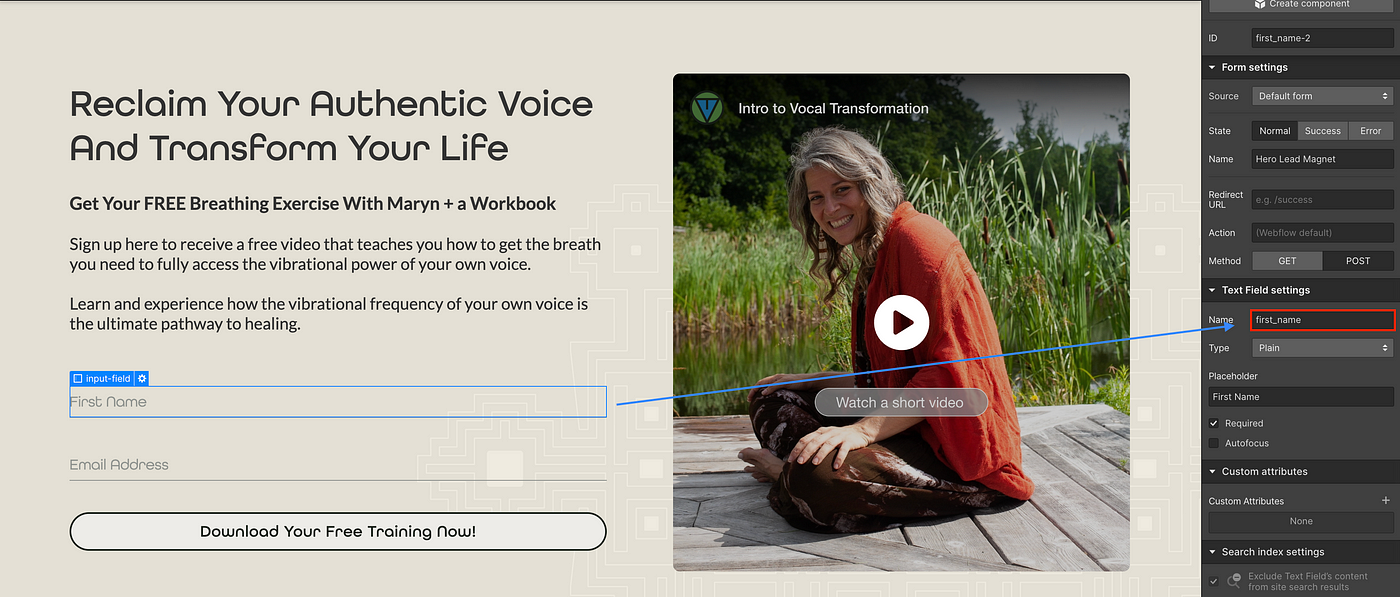
- In the Webflow designer, select the form input field you wish to set.
- Navigate to the Element Settings ⚙panel.
- Under the Text Field Settings section, you'll find the field name and type, such asName or email
- Set this name to correspond with a Klaviyo attribute. For instance, if you’re capturing emails, the input field name should be email to match Klaviyo's email attribute (see the list above).
- Repeat this for all fields, ensuring names match those in Klaviyo’s attribute list.
The more accurately you align your Webflow form fields with these standard Klaviyo attributes, the smoother your integration will be. Proper mapping ensures the data flows correctly, allowing you to make the most of Klaviyo’s powerful marketing and analytics features.
Note: For standard Webflow forms, ensure that the name attributes of the form input fields match exactly with the standard Klaviyo attributes (e.g., first_name, last_name, email, etc.). For any custom attributes not present in Klaviyo’s standard list, you can name them whatever you want, and our script will dynamically create custom properties assigned to the profile in Klaviyo.
And that’s it. Your form is configured once you add the Klaviyo list id, attributes, and custom properties.
Custom Webflow Forms and Script Integration
Setting Up Custom Webflow Forms
- Follow the same steps as the standard form.
- Example of a custom form with placeholders:
Implementing the Script
- Navigate to your Webflow dashboard, select your project, and go to Project Settings.
- Under the Custom Code tab, paste the script in the Before </body> tag section.
- Edit one value in the script: replace YOUR_KLAVIYO_COMPANY_ID with your actual Klaviyo company ID.
The Script Overview
- The script provided ensures that form submissions on your Webflow site are properly sent to Klaviyo.
- It works dynamically with both standard and custom attributes.
Script Example:
Testing and Finalizing the Integration
Testing the Webflow-Klaviyo Connection
- Test on a staging domain first.
- Use a temporary email for form submissions and check for Klaviyo's opt-in email.
- Test multiple data points and error handling.
Conclusion: Final Steps
- Replace the test list ID with your main list ID.
- Publish your changes to your main domain.
- Consistently test after any significant form or integration modifications.
Wrapping Up
- You've now successfully integrated Webflow with Klaviyo.
- Remember to clear test data from Klaviyo post-testing.